


Left click your mouse on Make a Clicker Grid > Custom
You will need 5 columns for the days of the week. Decide how many rows you will need – don’t forget breaks as well as lessons. A gap of about 6 works well. Choose a bright background colour.
Click on Options at the top of the screen
Click on User Preferences and check that Instant Pictures for Cells is ticked. You can also change the size of the picture here.

Point to a cell with the mouse. Hold down the Shift Key as you left click.
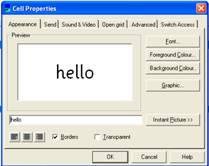
Type in your first word. It could be ‘hello’ or ‘register’. Press the Enter key. Words in the Clicker vocabulary will have a picture automatically come up as you do that.
If there is no picture and you want to search your computer for one: Hold down the Shift Key and right click on the cell. A dialogue box will come up.
Click on Graphic. This will give you one list of picture folders but there are others. You can get to these by clicking on the small yellow folder icon near the top of the window, to the right of the space that shows you what sort of graphics you are looking at.
 Click on the graphic that you want, then OK. It will appear in the cell.
You can also change the background colour of the cells using the same dialogue box. For example, lunchtime and breaks could have their own colour, or give literacy a particular colour.
Save your work by clicking on File at the top of the screen, then Save as template. This way you need only change some of it when you need to. Alternatively you could save a template that only has the basic structure of the day.
Laminate the timetable so that it will last longer. Making it smaller on the photocopier enables you to make one the right size for a pupil’s planner.
2003/2008